How To Improve The Quality Of Sound From Your Mic
By
09:33:00
Almost anyone who has been to a club in Second Life would have experienced a DJ or live performer who could hardly be heard on mic, or their mic quality was just generally poor. As this can be very off putting for listeners, this tutorial will offer a few tips on how to improve the quality of sound from a mic.
So long as you have a reasonable mic (not necassarily a high quality one), this tutorial should have something useful for you.
Although this tutorial is primarily aimed at Second Life DJs there is something here for anyone who uses a mic, including all online DJs, Skype users and anyone doing video voice overs.
There is also a video version of this tutorial on our new YouTube channel, or you can view the video at the bottom of this page.
Windows Settings
The first thing to do is check Windows mic settings. To do this follow these simple steps.1/ In the systems tray to the lower right of the screen is the sound icon. Left click on it and a small window similar to the above will appear. Select Recording Devices.
2/ The above window will now appear where you should see the active mic under the Recording tab, (assuming its connected to your PC). The blue bar to the right of the window shows its active. Double click on the mic icon.
3/ In the new window that opens select the Levels tab.
The first sliding setting adjusts the microphone volume. Here its set to 100%.
The second slider will boost the output of the mic. Here its set to 10dB, but the other two options are 20dB and 30dB. To find out what is the best setting for your mic, you'll have to experiement a little.
When you're ready click OK and the settings will be saved.
VoiceMeeter
VoiceMeeter is a great little application that is pay what you want (or free if you don't want to donate), that is easy to install and set up, and can make a big difference to the quality of sound from your mic. Once its downloaded and installed on your PC, reboot to complete the set up. Now open VoicMeeter to configure it for your mic.
1/ Under Hardware Out to the top right of VoiceMeeter select the A1 tab and a drop down window will appear, similar to the above. Select the audio output you use for your PC, with the MME option. In the above image MME: Speakers (Realtek High Definition) has been selected since its the default on my PC.
2/ Under Hardware Input to the top left, select the microphone settings. Two microphones can be connected but we're just going to add one, so click the first drop down tab, (highlighted in red, above), then select the default microphone input for your PC.
Unlike the output settings, here we'll select the WDM option, so my microphone setting becomes WDM: Microphone (Realtek High Definition).
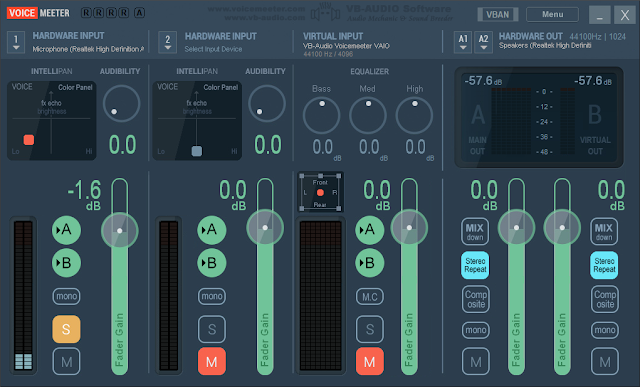
3/ Now that the mic is connected to VoiceMeeter, the sound output can be configured. Towards the lower left (highlighted in blue), M is mute so make sure you uncheck that.
Uncheck A (highlighted in yellow) so you can't hear yourself on mic immediately through your speakers or headphones, and leave B checked. You will now only hear what is said on mic when it has been streamed (i.e, you'll hear what you say on mic when others hears it).
The area highlighted in red is where the sound output of the mic can be manipulated. Grab the orange square and drag it to different parts of the darker area to see how it affects the mic output. The two most useful areas will likely be the lower right and the lower left.
The position of the orange square shows the setting I chose for my mic. To help demonstrate what VoiceMeeter can do, the first audio clip below shows what my mic usually sounds like, and the second is what my mic sounds like with VoiceMeeter.
Mic without VoiceMeeter
Mic with VoiceMeeter
Connecting VoiceMeeter to Streaming Software
All streaming software will configure VoiceMeeter differently, but the basics will be the same. Essentially you'll need to find where your mic connects to the software and replace it with VoiceMeeter.
The above image shows VoiceMeeter connected to Mixxx. Here is how it was added:
1/ Under Options > Preferences select Sound Hardware.
2/ Towards the bottom of the window click the Input tab.
3/ Under Microphone 1 select VoiceMeeter from the drop down list, then click OK.
After setting it up with your DJ software don't forget to start up VoiceMeeter before you start streaming.
If you need to improve the sound quality of your mic, checking the Window settings will be a good first step. Following that, installing VoiceMeeter should also give your mic a boost, and should help to make using your mic a much better experience for both you and your listeners.


